🎈 스텝 사용하기
test.step은 테스트 코드를 구조화하고 가독성을 높이는 기능이다. 테스트 코드의 특정 부분을 분리하고 타이틀을 달아 테스트 흐름을 명확하게 보여줍니다.
예시를 통해 스텝 사용 결과 차이를 확인해보자
아래는 select로 선택한 값과 input으로 입력한 값을 더한 결과를 p 태그에 보여주는 코드이다.
<!DOCTYPE html>
<html lang="en">
<head>
  <meta charset="UTF-8">
  <meta name="viewport" content="width=device-width, initial-scale=1.0">
  <title>Document</title>
</head>
<body>
  <select name="select" id="select">
    <option value="1">1</option>
    <option value="2">2</option>
    <option value="3">3</option>
  </select>
  <input />
  <p></p>
  <script>
    document.querySelector('input').addEventListener('input', function(e) {
      const p = document.querySelector('p');
      const select = document.querySelector('select');

      select.textContent = Number(e.target.value) + Number(select.value); ;
    });
  </script>
</body>
</html>
test.step을 사용해서 아래와 같이 코드를 구성하면 테스트 코드를 분리할 수 있다.
import { expect, test } from '@playwright/test';

test('Step Test', async ({ page }) => {
  await page.goto('http://127.0.0.1:5500/index.html');

  await test.step('step1', async () => {
    await page.getByRole('combobox').selectOption('3');
  });

  await test.step('step2', async () => {
    await page.getByRole('textbox').fill('2');
  });

  await expect(page.getByText('5')).toBeVisible();
});
테스트 실행 후 리포트 결과를 보면 스텝 사용 결과의 차이를 바로 확인할 수 있다. 테스트 코드의 흐름을 보여주는 것이 아니라 step으로 정의한 타이틀을 보여주게 된다. 이를 통해 리포트 결과를 분석할 때 용이하다.
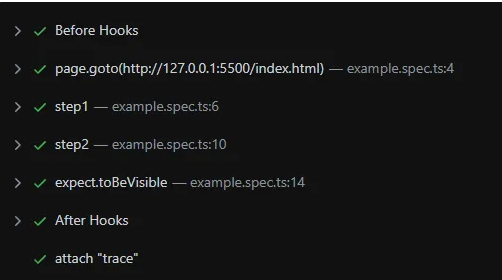
✨ 하나의 복잡한 테스트의 경우 흐름을 파악하기 힘든데 스텝을 사용하면 코드를 분리하여 흐름을 파악하는데 훨씐 쉬워진다.
📯 box 옵션 사용
test.step의 두번 째 파라미터로 옵션을 전달할 수 있다. 이중 box 옵션을 사용하는 경우 리포트의 오류 보고 방식이 변경된다. 스텝 내부에서 오류가 발생하면 정확한 위치가 아닌 해당 스텝을 호출한 위치로 오류가 표시된다.
아래의 테스트는 test 클래스를 가진 대상이 없기 때문에 해당 코드에서 에러가 발생하게 된다.(HTML은 위와 동일)
박스를 사용하지 않는 경우
import { expect, test } from '@playwright/test';

const step = async (page) => {
  return await test.step('step1', async () => {
    await page.getByRole('combobox').selectOption('3');
    await page.locator('.test').fill('2');
  });
}

test('Step Test', async ({ page }) => {
  await page.goto('http://127.0.0.1:5500/index.html');
  await step(page);

  await expect(page.getByText('5')).toBeVisible();
});
box 옵션을 사용하지 않으면 아래와 같이 실제 오류가 발생한 지점을 알려 준다.
  4 |   return await test.step('step1', async () => {
  5 |     await page.getByRole('combobox').selectOption('3');
> 6 |     await page.locator('.test').fill('2');
    |                                 ^
  7 |   });
  8 | }
박스를 사용하는 경우
import { expect, test } from '@playwright/test';

const step = async (page) => {
  return await test.step('step1', async () => {
    await page.getByRole('combobox').selectOption('3');
    await page.locator('.test').fill('2');
  });
}

test('Step Test', async ({ page }) => {
  await page.goto('http://127.0.0.1:5500/index.html');
  await step(page);

  await expect(page.getByText('5')).toBeVisible();
});
실제 오류가 발생한 지점이 아닌 스텝을 호출한 함수를 지정해준다.
test('Step Test', async ({ page }) => {
  11 |   await page.goto('http://127.0.0.1:5500/index.html');
> 12 |   await step(page);
     |         ^
  13 |
  14 |   await expect(page.getByText('5')).toBeVisible();
  15 | });
✨ 위와 같은 결과를 얻기 위해서는 스텝 코드가 외부 함수로 분리가 되어 있어야 한다.
'테스트 > Playwright' 카테고리의 다른 글
| [Playwright] 조건문, 반복문 사용 시 주의사항 (0) | 2025.03.30 |
|---|---|
| [Playwright] 드래그 앤 드랍 (0) | 2025.03.24 |
| [Playwright] Select 테스트 (0) | 2025.03.01 |
| [Playwright] Locator의 메서드 (0) | 2025.02.08 |
| [Playwright] 유의사항 (0) | 2025.01.31 |


